Before we begin, we created a session that you can download and listen to after you read this article, and use as a template for other songs. This template can assist you in creating SideChain Compression in your own mixes. You will find this link at the bottom of this article.
Compression is a very commonly used technique in Hit Dance Music for making various instruments within a song swell up and down. They usually swell down when a kick drum, or beat hits, and back up in between the space between hits. I’ve created a session that you can download and use to listen to, and use as a template for other songs, if you like. This a quite simple process that will go a long way in dance music, so buckle your seatbelts and keep your hands and feet in the car throughout the duration of the ride. Here we go! And if you like what you see below, feel free to join me for a hands-on Pro tools class in person at ProMedia Training.
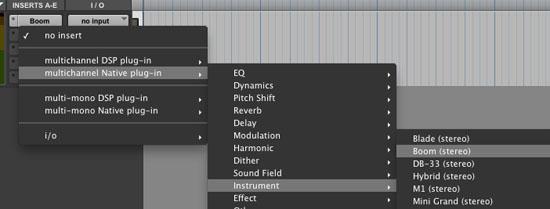
First, I created an instrument track,

And then inserted Boom on it:
I’m going to use it as a trigger, or sidechain, for the other tracks that need to swell or pump. By programming a quarter note bass drum pattern, also known as “four on the floor” to musicians, this will be the source of the other tracks to swell between. Here’s how I did it. You can follow along, or download the session, which is already done.
I started by selecting the Pencil Tool first:

Then I choose Grid Mode:

And changed my Grid value to 1/16 note:

Then I drew in notes on all of the thicker lines, which are where the quarter note hits. I’m using the 1/16 note grid for later use in programming drums.

After drawing the notes, I’m going to send the output of this bass drum pattern to a bus, and it will become the sidechain source for all other tracks that need to swell down between each bass drum hit. By right clicking on the output “Bus 1”, I renamed it “Kick trigger” for easier location later.

The trigger is now loaded and ready to go!
Next, I created an Instrument track, inserted Xpand!2, and recorded a long pad sound onto the track. I did this by:
Record arming the track:

And then pressing Record and Play, and I played the notes from my USB MIDI keyboard that I wanted to hear from the Pad sound I loaded in.

BONUS TIP!
The two instrument tracks above could also have been audio tracks, or loops. The first being a bass drum loop as the source, and the other, a musical loop on the bottom.
And now, for the moment you’ve all been waiting for, Key Compression!
Insert the Dyn3 Compressor after the Instrument creating the musical sound, or onto the audio track with the musical loop as shown:

Then set the settings as follows:
- Change the Key source from “No Key Input” to Bus > ”Kick Trigger”
- Turn on the “Key” symbol next to “SIDE-CHAIN”
- Set the RATIO all the way to the right[100.0:1]
- ATTACK: to the left [10.0 us ]
- THRESHOLD: down until hearing a significant swelling of the musical sound.
- RELEASE: adjusted until the swelling sound to be in time with the beat

I hear some club action going on!
Next, I added a few more instrument tracks with pad and arpeggiator sounds, and copied the compressor onto the new tracks by holding Option(ALT/Win), and dragging the plug-in Dyn3 Compressor from the first track onto the others to swell with it. On another instrument track, I inserted Boom, and programmed an old-school Bambaata beat for fun. You’ll have to download the session to hear it though, so what are you waiting for?
›› SIDE CHAIN COMPRESSION TEMPLATE TO DOWNLOAD HERE
BONUS ROUND
Still Here?
Alrighty then!
Making your existing mix pump with the beat
This is a very similar process to what you just did with side chain compressing a few tracks from a kick, except we’re going apply it to several tracks together. This is a very common technique used on many of the hit records out there from David Guetta, and many Dance/DJ type producers alike. The idea of side chain compression is to make certain elements of a song dip down in volume so that others can be heard very clearly. This is kind of like giving priority to one or more tracks to always be heard above others. In popular dance music, this is typically the bass drum and vocals, so I’m going to show you an easy way to do this with your existing song.
In this example, I’m going to route all of the music tracks into a group track, insert a compressor onto the group, and side chain compress all the music from the kick, or bass drum track. This will allow the bass drum to always be heard and have priority, as well as the vocal tracks.
First: highlight all of the instruments to be grouped and side chained by clicking on the first track name, and then while holding shift, click on the last track name to highlight all the desired tracks. Holding command and clicking on tracks will allow you to highlight individual tracks. As you can see, I have a track of bass drums that already has its outputs set to a bus named ”kick trig”.

Next: Hold shift and Option(ALT/Win), and click on one of the tracks outputs, and choose “New Track”


Now, we can insert a compressor plug-in onto the group track, and dial in the same type of settings on the compressor from the previous example. Like before, adjusting the THRESHOLD and RELEASE settings will adjust the times at which the pumping will happen. Adjust them until the pumping sounds in time.

Viola!
Side chaining made easy!