Official Avid Learning Partner Calendar PT201+210Music: May 4, 5, 11, 12, 18, 19 PT101+110 Weekend: May 4, 5, 11, 12, 18, 19 PT101+110 NIGHT: May 6, 7, 9, 13, 14, 16, 20, 21
PT101+110 Weekday: May 13, 15, 17, 20, 22, 24 DOLBY ATMOS 205+210D: Jun 1, 2, 8, 9, 15, 16 PT101+110 Weekend: Jun 8, 9, 15, 16, 22, 23 PT101+110 Weekday: Jun 17, 19, 21, 24, 26, 28 PT201+210P Post: July 13, 14, 20, 21, 27, 28
** 3-4hrs per day **24-28 Course Hours
In-Person Los Angeles: 32 hrs (10am-6pm PST) PT101+PT110: May 9, 10, 11, 12 PT101+PT110: June 6, 7, 8, 9 Register: 888-277-0457
Upcoming Pro Tools Training
Live Online Pro Tools Certifications AVID Learning Partner Calendar
PT201+210Music: May 4, 5, 11, 12, 18, 19 PT101+110 Wkend: May 4, 5, 11, 12, 18, 19 PT101+110 Night: May 6, 7, 9, 13, 14, 16, 20, 21 PT101+110 Wkday: May 13, 15, 17, 20, 22, 24 DOLBY ATMOS 205+210D: Jun 1, 2, 8, 9, 15, 16
PT101+110 Wkend: Jun 8, 9, 15, 16, 22, 23 PT101+110 Wkday: Jun 17, 19, 21, 24, 26, 28
PT201+210P Post: July 13, 14, 20, 21, 27, 28
** 4-hrs per day ** 6-8 Day Course
In-Person Los Angeles (32 hr Class, 10am-6pm PST) PT101+PT110: May 9, 10, 11, 12 PT101+PT110: Jun 6, 7, 8, 9 Register: 888-277-0457
Mixing With Clip Gain In Pro Tools
Mihai Boloni
Tips and Tricks
As most engineers and producers know, the best start to a good mix is a proper recording. While we cannot always control this aspect of the process, the Clip Gain feature allows you to adjust the audio levels prior to beginning the mix.
There's no denying that you, like most of us, have spent a great deal of time thinking about "Mixing". All those wonderful plug-ins, automation, hardware, etc... can be quite a topic of conversation. Often times, in our quest for cool gear, we overlook how important the initial recordings are when it comes to mixing. We have to accept that no matter how "vintage" or "boutique" a piece of equipment is, it can only do so much. The lower quality audio signal you feed into your equipment, the lower quality sound it will output. This becomes especially evident when you have a recording with variable levels of loudness. You might find yourself in a situation where your compress/eq setting sound good for one part of the production, but sound completely wrong for another part. Since all of our audio equipment works based on the amount of level (energy) we feed into it, we can get a more consistent and reliable result if we make sure the audio levels we record are nice and even, without much fluctutation between the loudest and softest parts. The same applies for film and television, especially when it comes to dialogue. You don't want the viewer struggling with the volume over parts that are too soft or too loud.
Luckily, Pro Tools has a feature called Clip Gain that allows you to adjust the levels of the recorded audio material, allowing you to fix any problems before you start launching plug ins and mixing.
Clip Gain Basics
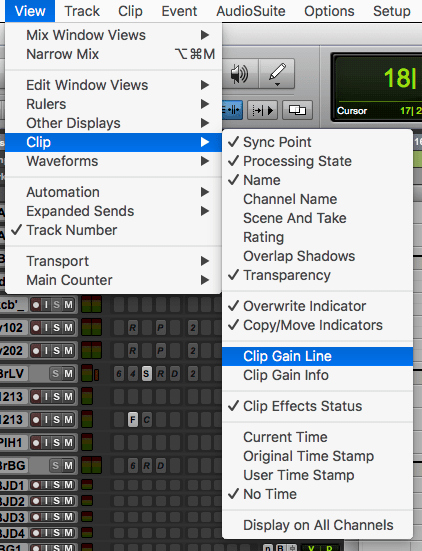
The first thing to note is how you can show the information associated with Clip Gain. Go to the "View" menu in Pro Tools, scroll to the "Clip" sub menu. You will see the options for "Clip Gain Line" and "Clip Gain Info" toward the middle of the menu.
Clip Gain Info
Once you select Clip Gain Info, you will see a small fader icon, along with a numerical dB graphic appear in the lower left hand corner of ever audio clip in your session.
Clip Gain Line
By selecting the Clip Gain Line, you will now see a flat line show up in every audio clip. This will appear the same way whether you have a mono, or stereo audio clip.
Shortcut FYI: Even though you don't see a shortcut available for Clip Gain, Pro Tools has a special easter-egg surprise, hidden shortcuts! Show Clip Gain Line: control + shift + - (hyphen/underscore key) Show Clip Gain Info: control + shift + + (plus/equals key)
Using Clip Gain
Now that we know how to show and hide the Clip Gain feature, let's explore how it works to better understand its usefulness. The most important thing to always remember about Clip Gain is that it is affecting the audio files on the hard drive level. Any changes you make are stored within the audio file iteself, not as a function of track autmation. By turning up, or down, the Clip Gain, you are altering the recorded level of the audio files. It's similar to adjusting the pre-amp levels while you're recording. You are not making any chanes to the "volume fader" on the track, you are in fact individually adjusting each clip before they flow into the mixer and plug-ins. From a mixing perspective, this allows us to make changes to the audio files, thus giving us a more balanced and even audio signal flowing into the processors and volume of the mixer console. You can make adjustments to Clip Gain either as a static adjustment across the entire clip, or dynamically adjust the gain across the clip. The range of adjustment is -144dB to +36dB.
Decrease Clip Gain
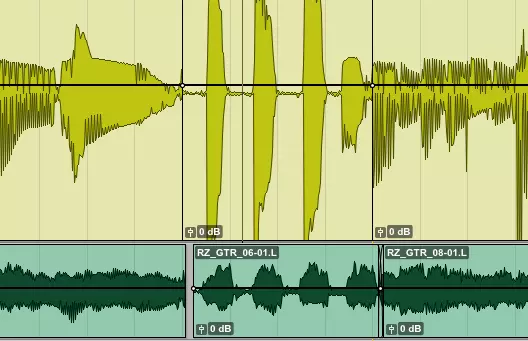
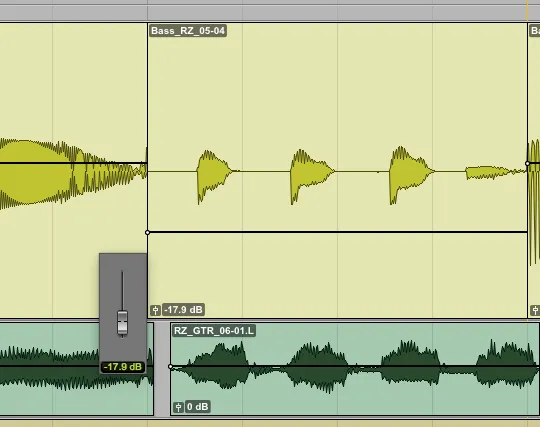
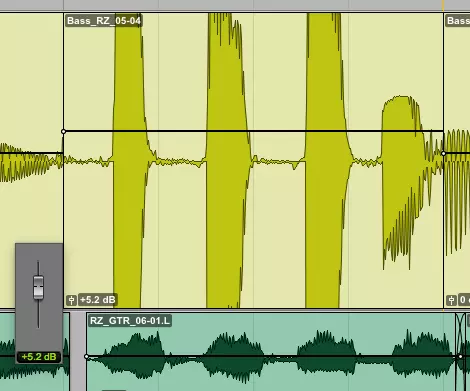
To apply a static change to clip gain, click on the Clip Gain Info button in the bottom left corner of the clip. You'll notice a floating fader come into view. As you move your mouse up or down, this increases or decreases the amount of gain you are applying to that single clip. You'll notice the size of the waveform also increase or decrease with this change. This is due to the fact you are making changes to the actual audio file on the hard drive, thus increasing or decreasing the "recorded" level, before it flows through the mixer.
Notice in the picture above, the difference in size. In the top most picture, Clip Gain is reduced, resulting in smaller waveforms. In the 2nd pic, Clip Gain is increased, resulting in much taller waveforms. This would be the same result if we turned up or down the gain on the pre-amp as we were recording. Although it is effective to make wide sweeping changes, you also have the ability to make dynamically change the Clip Gain over time. By utilizing the tools, you can effectively draw Clip Gain changes to make precise changes over time giving you the balance you are looking for.
The easiest way to make an adjust to individual section is to select the are and use the Trim Tool to increase or decrease the Clip Gain. This is especially helpful if a particular section needs adjustment, but not the entire clip. If you need to get even more specific, you can use the Grabber Tool to draw Clip Gain changes over time. Once you click on the clip gain line, you'll drop an anchor point which can be moved and manipulated along with other anchor points.
Notice the pic above how much of a change has been applied to the Clip Gain. Instead of relying on a selection based change, I have added as many anchor points as I needed in order to draw the shape. You can also use the Pencil tool to draw in the changes as well. You can use all of the sub tools, other than Parabolic and S-Curve. Yes, Random does work, although I would suggest against randomly drawing gain changes to your audio files.
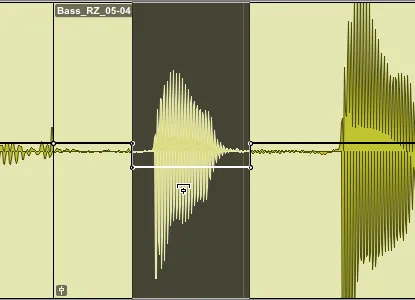
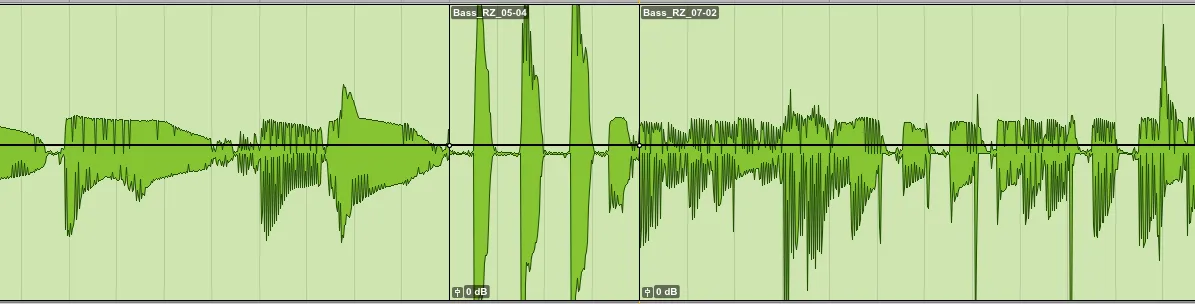
Above is an example of a bass part we recently recorded. Most things are ok, other than the part in the middle where the waveform is noticeably bigger than everything around it. When we listen to it, yes, in fact it is much louder than the rest of the notes around it. Aside from the level difference, the most obvious problem is how this will impact any compressors, eq's, or other processors in the track. You could set levels based on the main body of sound, and it all falls apart over those few notes as they overdrive and distort the compressor.
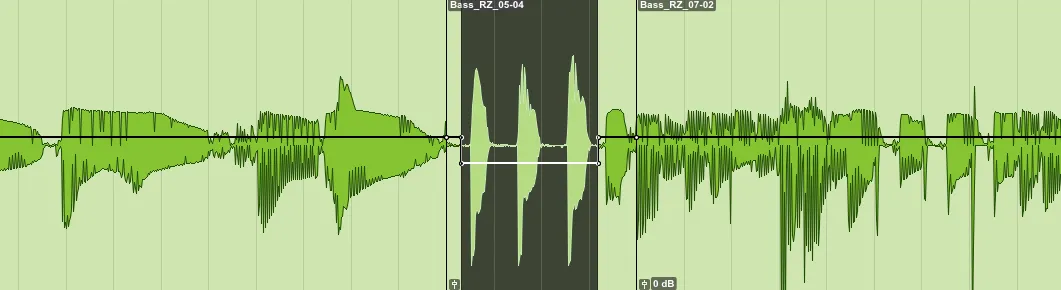
The simple solution is to use Clip Gain to lower the level of that section until it sounds even with the rest of the audio around it. In the above example I used the Selector tool to make the selection, and the Trim tool to decrease the gain.
This feature is especially useful in the Post Production world of Television & Film where audio clips are combined from several different sources. For example: recordings done outside while filming a scene mixed with ADR overdubs recorded in a studio. Aside from the environmental variables, the levels of the recordings will likely be very different, however, they need to sound equal for the film audience. Since the studio engineer has no control over the pre-amp gain of the mobile engineer, Clip Gain is used to boost or cut the gain of the audio files to balance their levels.
Fun Fact: In England and Europe the studio position of Balance Engineer exists
Editing Clip Gain
Along with the manual editing functions, several other features relating to Clip Gain can be accessed through menu's or the right-click of your mouse. You have the option to Bypass/Unbypass the changes, as well as being able to fully render the changes making them permanent. To access these features, righ-click on the clip to access the clip menu.
You will see the Clip Gain sub-menu in the middle of the pop-out window. This allows you to access the Bypass/Unbypass commands, as well as the Render command. Also, this menu allows you to Copy the Clip Gain changes in order to apply them to another clip. The most important function found in this menu the the Clear command, which let's you remove any existing Clip Gain changes.
HD Only Features
For those of you out there using an HD system, you will have a few more features than the standard version of Pro Tools. These features can be found under the Automation sub-menu under the Edit menu.
HD systems have the ability to Convert Clip Gain to Volume Automation (and vice versa) as well as Coalesce Clip Gain and Volume Automation. The Convert feature allows you to take the graphical changes in Clip Gain and apply them as Volume automation. Remember your signal flow, Volume Automation comes after plug-ins, and after Clip Gain. The Coalesce feature allows you to merge the Volume data and Clip Gain data into a single whole. The Coalesce feature is not the most widely sought after feature, just saying.
Overview
Clip Gain vs. Automation:
- Clip Gain is applied pre-mixer (before any plug-in processing) - Clip Gain is stored within the clip - Each edit playlist can have individual Clip Gain settings, compared to a single Volume Automation playlist. (Article on Playlists)
Changes can be applied statically across the entire clip, or dynamically with changes over time
Mihai BoloniCreative Director & Avid Expert Pro Tools instructor
Mihai has made it his life's work to help others in the audio industry. Mihai gained experience as an audio engineering Full Sail Instructor in early 2000's and joined ProMedia in 2002. He is now regarded as one of Avid's leading and most experienced, in-demand Instructors and Pro Tools technical consultants for complex studio configurations. Corporate clients include MTV, PBS, NBC, Telemundo, The Voice's Chief Engineer Mike Bernard, Atlanta Public School System, countless professors from leading Universities, CNN, Turner Broadcasting, and the top producers, artists, and engineers in leading studios and record labels. For over 20 years, Mihai has continued to work as an Audio Engineer, Record Producer, Songwriter (ASCAP), Dog Lover, and Expert Level AVID Certified Pro Tools Instructor.
Live Online and Hands-On, In Class Pro Tools Training Available -
Promedia Training offers Pro Tools Training, from beginner to advanced, including Avid Pro Tools Certification and is an official Avid Training Facility. Learn Recording, Editing and Mixing in Pro Tools and take your Music Production to the next level.
Perfect for singers, songwriters, musicians, producers, and audio engineers, including Expert Level Training.
5)Private Training- Arranged in office; please call 888-277-0457.
For Over 20 years, ProMedia has ben an official Avid Training and Certification Center working with beginners to the most advanced users with weekend and short-term Pro Tools Courses.
Beginner's On A Budget Pro Tools Fundamentals Course Overview: PT100