Official Avid Learning Partner Calendar DOLBY ATMOS 205+210D: Jun 1, 2, 8, 9, 15, 16 PT101+110 Weekend: Jun 8, 9, 15, 16, 22, 23 PT101+110 Weekday: Jun 17, 19, 21, 24, 26, 28 PT101+110 Night: July 8, 9, 11, 15, 16, 18, 22, 23 PT201+210P Post: July 13, 14, 20, 21, 27, 28
** 3-4hrs per day **24-28 Course Hours
In-Person Los Angeles: 32 hrs (10am-6pm PST) PT101+110: June 6, 7, 8, 9 (Sold Out) PT101+PT110: June 13, 14, 15, 16 PT101+PT110: July 11, 12, 13, 14 Register: 888-277-0457
Upcoming Pro Tools Training
Live Online Pro Tools Certifications AVID Learning Partner Calendar
DOLBY ATMOS 205+210D: Jun 1, 2, 8, 9, 15, 16 PT101+110 Weekend: Jun 8, 9, 15, 16, 22, 23 PT101+110 Weekday: Jun 17, 19, 21, 24, 26, 28 PT101+110 Night: July 8, 9, 11, 15, 16, 18, 22, 23 PT201+210P Post: July 13, 14, 20, 21, 27, 28
** 4-hrs per day ** 6-8 Day Course In-Person Los Angeles (32 hr Class, 10am-6pm PST) PT101+PT110: Jun 6, 7, 8, 9 (Sold Out) PT101+PT110: Jun 13, 14, 15, 16
PT101+PT110: July 11, 12, 13, 14 Register: 888-277-0457
5 Tips For Organizing Your Pro Tools Session
Mihai Boloni
Tips and Tricks
To be the most effective producer or engineer possible, you need to have an organizational system that will allow you to navigate your ProTools session quickly and efficiently. ProTools has many built-in options to help you organize your tracks and timeline in a logical way. This tutorial will show you some tips on how to best organize your sessions.
Managing large ProTools sessions can be a daunting task. When you’re staring at a large number of audio tracks, instrument tracks, aux tracks, etc., it’s easy to get lost in both the Edit window and Mix window. Without a system to stay organized, it can take you much longer to edit or mix a session. If you’re constantly scrolling through your tracks, trying to find the instrument you want to adjust, you’re wasting a lot of time. You should be able to quickly locate and identify each track in your session, thus improving your efficiency.
Fortunately, ProTools offers a plethora of options to help you organize your sessions, thus allowing for easy navigation and swift edits. While it’s ultimately up to you how you want to organize your session, the following tips can help get you started.
Tip 1: Proper Labeling
This may seem like the most obvious thing in the world, but there are plenty of producers and engineers that fail to properly label their tracks. When you create a new audio track, the name of the track will default to “Audio 1”; if you create multiple tracks, each subsequent track will be labeled “Audio 2,” “Audio 3,” and so on. Without proper labeling, you will be left with a whole session full of tracks labeled “Audio X,” and you won’t know what instrument is on which track.
The best practice is to always label a track when you create it. When you record on a track, ProTools will name all newly recorded audio files based on the track name. So, if you leave your newly created track named “Audio 1,” you will end up with lots of clips in your clip list named “Audio 1_01,” “Audio 1_02” and so on. To name your track when you create it, simply type in the appropriate instrument into the New Track dialog box, as shown below.
However, you’ll often need to name or rename your tracks after they have already been created. To do so, double-click on the track name within the Edit window or the Mix window. This will open the Track Name dialog box, where you can rename the track however you want. If you have multiple tracks that need to be renamed, you can cycle through your tracks using the Next and Previous buttons—or you can use the keyboard shortcut Command+Left/Right Arrow (Mac) or CTRL+Left/Right Arrow (Windows).
Tip 2: Organizing Similar Instruments
Once all your tracks are correctly labeled, you will want to organize your tracks by instrument, placing instruments of the same family next to each other. There are different ways you can organize instrument families, but here is a format that some engineers use:
Drums
Percussion
Bass
Guitars
Piano/Keys
Lead Vocals
Background Vocals
This is just one example of instrument family organization, not the only way to do it. Some engineers prefer to organize their tracks more similarly to an orchestral score: low frequency instruments and drums at the bottom, higher frequency instruments at the top. It’s up to you how you want to organize your session, but whatever you choose, remain consistent.
Tip 3: Color Code By Instrument Family
In addition to organizing your individual tracks by instrument, I recommend color coding your instruments to quickly identify different instrument families in your session. It doesn’t matter which colors you use for which instruments—just so long as you remain consistent between your sessions. To open the Color Palette window, navigate to Window > Color Palette.
To assign a track or tracks to a certain color from the Color Palette window, simply click on a track to select it, then select your desired color from the Color Palette window. You can assign multiple tracks to the same color by Shift+Clicking multiple tracks, then selecting a color. In addition, you can adjust the saturation and brightness of the select color by using the designated sliders.
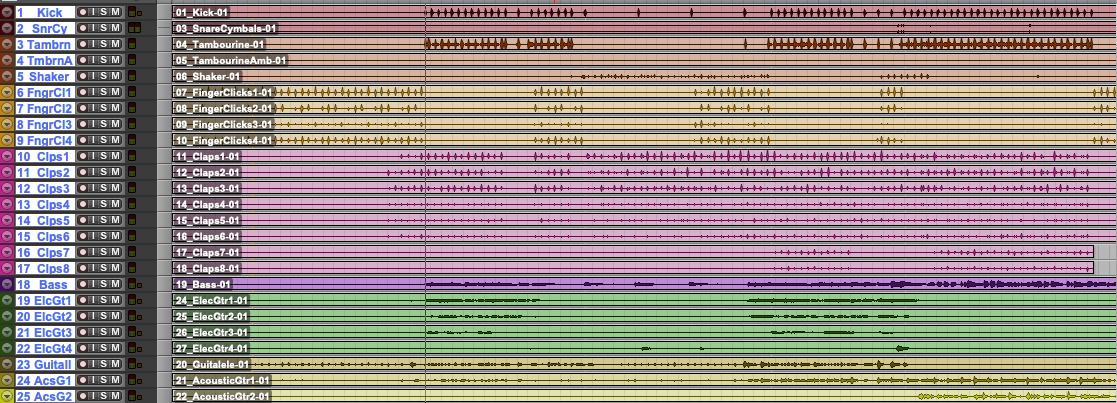
Below is an example of a session with tracks color-coded by instrument family. The drum tracks are red, percussion tracks are dark orange, electric guitar tracks are green, etc. By color coding in this way, it is much easier to recognize instrument families by simply looking at your session—I don’t need to read every track name to figure out where my electric guitars are. This is why it’s important to remain consistent between your projects—I always make my electric guitars green, so I can always find them quickly even when I’m working in different sessions. A secondary benefit to color coding is that your session will look very pretty!
Tip 4: Markers
Markers can be used in a session to show you song sections or important moments in your timeline, and they allow you to navigate between them quickly. In music production, it’s extremely useful to have a separate marker for each Verse, Chorus, and Bridge in your song. Having these markers set will improve your workflow as you mix, edit, or record.
To see the markers you place, you will need to make sure your Markers Ruler is toggled on. To do so, navigate to View > Rulers > Markers and make sure it has a checkmark next to it. If it doesn’t, click it to toggle on your Markers Ruler.
Once it is toggled on, it will appear in the Rulers section of the Edit window. Now, when you click the + symbol to the right of the Markers Ruler, a new marker will appear wherever your payback cursor is located. Using this method, you can place the playback cursor at the beginning of each new song section, create a new Marker for each section, and label it appropriately.
Whenever you create a new marker, the Edit Memory Location dialog box will open. This is where you can name your marker. You’ll notice that the Edit Memory Location dialog box offers a bunch of other advanced settings under the Time Properties and General Properties sections. For the purposes of this tutorial, we won’t be diving into these more advanced settings—we are just going to use this dialog box as a way to label our markers.
When you have finished added and labeling all of your markers, your Markers ruler will look something like this:
This will help you be able to quickly find and navigate to your desired song section without needing to constantly click around your session to find the right spot. You can click on any of your markers, and the playback cursor will be placed at its location. Now you can quickly hop around from Verse to Chorus to Bridge.
Tip 5: Color Code Markers
Not only can we color code our tracks, but we can color code our markers as well. To do so, first navigate to your ProTools Preferences and check the box next to “Always Display Marker Colors.”
ProTools will automatically color code your markers, buy you can also choose what color you want each marker to be. Doing so is very similar to color coding your tracks. Open the Color Palette window by navigating to Window Color Palette. Now just click whichever marker you want to color, and then select your preferred color from the Color Palette window.
When you color code your markers, the ruler itself will display that color up until the proceeding marker, as shown below:
Again, there is no right or wrong color to use for each marker—just use a system that is beneficial for your editing style and workflow.
With these few tips, you can organize your ProTools sessions in a way that makes you a more efficient artist, producer, and/or engineer. Improving your workflow frees your mind from stressing about where everything is located, allowing you to focus on being creative.
Alex Thomen
Author: Alex Thomen Composer / Arranger / Pro Audio Instructor ProMedia Training, LLC www.protoolstraining.com
888-277-0457
Alex ThomenComposer / Arranger / Music Technology Instructor
Alex Thomen is a producer, composer, pianist, mixing engineer, and music educator. He attained his Master's Degree in Commercial Music Composition and Arranging from Belmont University in Nashville, TN and taught as an instructor in Music Production at University of Miami Frost School of Music. From small-scale chamber groups and rock bands to full symphonic orchestra, Thomen arranges, produces, and mixes for a variety of ensembles and styles. Thomen’s education and experience have helped refine his skills in contemporary music production for Film/TV/Games. From ambient, musical soundscapes to fantastical, orchestral pieces, television commercials, and more, Thomen’s creative output evokes a vast variety of moods, settings, and themes.