Official Avid Learning Partner Calendar DOLBY ATMOS 205+210D: Jun 1, 2, 8, 9, 15, 16 PT101+110 Weekend: Jun 8, 9, 15, 16, 22, 23 PT101+110 Weekday: Jun 17, 19, 21, 24, 26, 28 PT101+110 Night: July 8, 9, 11, 15, 16, 18, 22, 23 PT201+210P Post: July 13, 14, 20, 21, 27, 28
** 3-4hrs per day **24-28 Course Hours
In-Person Los Angeles: 32 hrs (10am-6pm PST) PT101+110: June 6, 7, 8, 9 (Sold Out) PT101+PT110: June 13, 14, 15, 16 PT101+PT110: July 11, 12, 13, 14 Register: 888-277-0457
Upcoming Pro Tools Training
Live Online Pro Tools Certifications AVID Learning Partner Calendar
DOLBY ATMOS 205+210D: Jun 1, 2, 8, 9, 15, 16 PT101+110 Weekend: Jun 8, 9, 15, 16, 22, 23 PT101+110 Weekday: Jun 17, 19, 21, 24, 26, 28 PT101+110 Night: July 8, 9, 11, 15, 16, 18, 22, 23 PT201+210P Post: July 13, 14, 20, 21, 27, 28
** 4-hrs per day ** 6-8 Day Course In-Person Los Angeles (32 hr Class, 10am-6pm PST) PT101+PT110: Jun 6, 7, 8, 9 (Sold Out) PT101+PT110: Jun 13, 14, 15, 16
PT101+PT110: July 11, 12, 13, 14 Register: 888-277-0457
Automation Modes In Pro Tools
Alex Thomen
Tips and Tricks
Track Automation is one of the essential steps in modern mixing, especially in complex arrangements. Instead of leaving volume faders, pan controls, and other channel strip or plug-in parameters static throughout an entire track, automation allows us to program changes to these parameters as our song progresses in time.
Automation allows us to make dynamic changes to our mix during the course of playback. Understanding the different automation modes in Pro Tools will ensure that you are programming your automation effectively. Inputting automation is one of the essential steps in modern mixing, especially in complex arrangements. Instead of leaving volume faders, pan controls, and other channel strip or plug-in parameters static throughout an entire track, automation allows us to program changes to these parameters as our song progresses in time. Bringing up the guitar fader during a big chorus, enabling a tape delay for specific words on the vocal track, and slowly increasing the position of a cutoff filter are all examples of automation.
Before you can implement automation in creative ways, you must first understand the different automation modes available in Pro Tools. Using the wrong automation mode for your specific purpose can result in the failure to record your automation, or worse, overwriting existing automation for multiple elements in your mix, forcing you start the automation process over.
Let’s start by establish where we can find these automation modes. Then, we will define each mode and discuss the appropriate contexts for their use.
The Automation Mode selector can be found in both the Edit and Mix Windows. In the Edit window, the Automation Mode Selector is located just beneath the Track View Selector. The Automation Mode defaults to “Read,” as seen below.
In the Mix Window, the Automation Mode Selector is located beneath Inserts and Sends, and it is labeled “AUTO.”
When we click on the Automation Mode selector, we can now see all the automation modes we can use in Pro Tools: Off, Read, Touch, Latch, Touch/Latch, and Write. If you are using Pro Tools Ultimate, you will also be given a “Trim” option, which modifies the behavior of Touch, Latch, Touch/Latch, and Write modes.
Before diving into each mode’s unique functions, I want to make clear that the different automation modes pertain to automation that is recorded into Pro Tools in real-time. Using either an external control surface or by interacting with Pro Tools’ UI (dragging faders, pan knobs, etc.) is how we record automation in real-time. An alternative to this kind of automation writing is called Editing Breakpoint Automation, in which you can edit an automation playlist by adding, moving, or deleting breakpoints using the Grabber tool.
If you are using Editing Breakpoint Automation to mix your tracks, the different automation modes will not affect your automation input. However, putting the automation mode on something other than “Read” puts your track at risk of being overwritten by unwanted automation during playback. Therefore, if you prefer using Breakpoint Automation, I recommend leaving your automation mode on “Read.”
Modes: Off and Read
“Off” is the most self-explanatory automation mode. When it is selected, all automation written on a track will be not be played back. In “Off” mode, no parameter changes are recorded as automation and any existing automation on the track will be ignored. It can be useful to switch over to “Off” mode if you want to hear your track completely without automation.
“Read” is the default automation mode in Pro Tools. In this mode, any automation on the track will playback as written. If you have written automation for the volume fader, for example, Read mode will playback those changes to the volume fader. Although Read mode will playback existing automation, it cannot record any new automation. That being said, you can still make automation edits via the automation playlist and Edit tools, but you will be unable to record automation changes in real time.
If you are recording automation in a different automation mode, it is good practice to always switch back to “Read” mode when you finish to make sure you don’t accidentally record unwanted automation data.
Touch Mode Automation
Touch Mode writes automation when an enabled control is touched (or clicked) and continues writing until the control is released. After the control is released, the control returns to previously written levels. Touch Mode is useful if there is a certain section of a track that you want to automate, but you want the automation to return to its initial level after you let go of the parameter you’re adjusting.
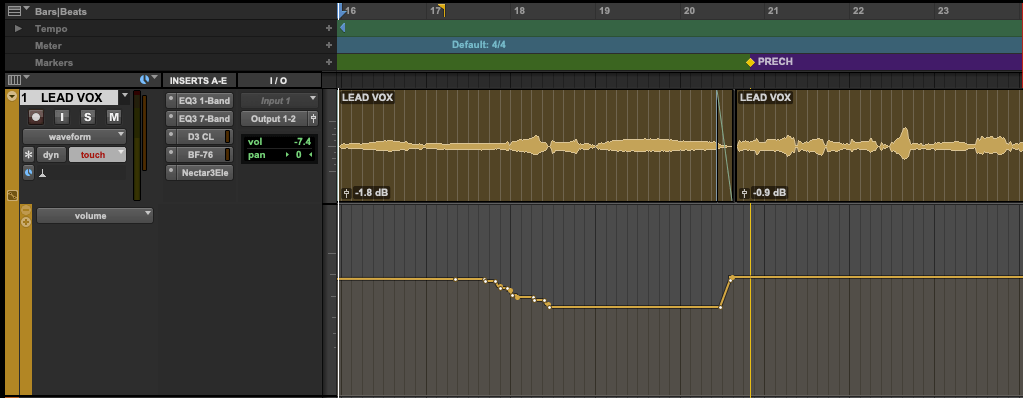
The example below shows what your Automation Playlist may look like after recording with Touch Mode. Just after bar 17, I clicked on the Volume Fader and began to slowly drag it down to its lowest position. I kept my mouse clicked until halfway through bar 20. After releasing the mouse, the automation returned to its initial resting point (the value set before I clicked the mouse).
An easy way to remember how Touch Mode works is to understand that automation is only written while you are “touching” a parameter. When you let go of that parameter, the automation stops writing.
Latch Mode Automation
Latch Mode writes automation when an enabled control is touched (or clicked) and continues writing until playback stops. The main difference between Latch Mode and Touch Mode is that Latch Mode will not return to the previously written automation level when you let go of a control—it will continue writing automation even after letting go!
In the example below, I performed the same motions as I did with the Touch Mode example—clicking the Volume Fader after bar 17, dragging it down to its lowest value, etc. However, when I let go of the volume fader at bar 20, notice the volume automation did not go back up to its initial position. Instead, it remained at the same value as the track continued to play.
Latch Mode functions similarly to Touch Mode, but when you let go of the parameter you’re automating, it will “latch” to that value until you stop playback.
Touch/Latch Mode Automation
Touch/Latch Mode places a track’s Volume control in Touch mode and all other track controls in latch mode. This mode is primarily used for long-format mixing such as films, live concerts, or documentaries. While in this mode, you can play for long sections at a time, continuing to do small volume updates. However, when you move another parameter (such as the pan knob), the control will not revert to its previous setting when you let go. This allows you to pan a track and have it ‘stick’ in that position until you press stop.
Write Mode Automation
Write Mode writes automation from the time playback begins until playback stops, replacing any existing automation on a track. Write Mode can be a dangerous automation mode to use, as it will overwrite any existing automation on your track the moment you hit “Play.” I would recommend only using Write Mode if you know exactly what you’re doing and what parameters you are controlling. It’s important to carefully control which parameters are write-enabled in the Automation Window (Command + 4 on the numeric keypad) to ensure you are only automating your desired parameters.
For example, according to my Automation Window setup, the moment I click play in my session (while Write Mode is enabled) Pro Tools is going to write automation settings for track volume, pan, mute, and plug-in settings. Since Write Mode records automation for multiple parameters at once, it is very important to be aware of what parameters are Write Enabled.
Automation is an extremely powerful tool for the modern producer and mixing engineer. Utilizing Pro Tools’ various automation modes allows for precise control over changes in your mix, allowing for powerful, dynamic mixes and compositions.
Alex Thomen
Author: Alex Thomen Composer / Arranger / Pro Audio Instructor ProMedia Training, LLC www.protoolstraining.com