Official Avid Learning Partner Calendar DOLBY ATMOS 205+210D: Jun 1, 2, 8, 9, 15, 16 PT101+110 Weekend: Jun 8, 9, 15, 16, 22, 23 PT101+110 Weekday: Jun 17, 19, 21, 24, 26, 28 PT101+110 Night: July 8, 9, 11, 15, 16, 18, 22, 23 PT201+210P Post: July 13, 14, 20, 21, 27, 28
** 3-4hrs per day **24-28 Course Hours
In-Person Los Angeles: 32 hrs (10am-6pm PST) PT101+110: June 6, 7, 8, 9 (Sold Out) PT101+PT110: June 13, 14, 15, 16 PT101+PT110: July 11, 12, 13, 14 Register: 888-277-0457
Upcoming Pro Tools Training
Live Online Pro Tools Certifications AVID Learning Partner Calendar
DOLBY ATMOS 205+210D: Jun 1, 2, 8, 9, 15, 16 PT101+110 Weekend: Jun 8, 9, 15, 16, 22, 23 PT101+110 Weekday: Jun 17, 19, 21, 24, 26, 28 PT101+110 Night: July 8, 9, 11, 15, 16, 18, 22, 23 PT201+210P Post: July 13, 14, 20, 21, 27, 28
** 4-hrs per day ** 6-8 Day Course In-Person Los Angeles (32 hr Class, 10am-6pm PST) PT101+PT110: Jun 6, 7, 8, 9 (Sold Out) PT101+PT110: Jun 13, 14, 15, 16
PT101+PT110: July 11, 12, 13, 14 Register: 888-277-0457
Setting Tempo And Advanced Tempo Changes | Video Tutorial
Alex Thomen
Tips and Tricks
Tempo is one of the foundational elements of a song’s composition. Tempo is simply the speed at which a song is performed, or in our case, the speed at which Pro Tools will playback your session. In this article and video you'll learn how to apply tempo, and make advanced tempo changes in your Pro Tools Session.
Pro Tools offers a variety of methods for tempo editing, giving you complete control over your session’s playback. In Pro Tools, tempo is always designated as a numerical Beats Per Minute (BPM) value. So, if you set your session tempo to 100, your session will playback at a tempo of 100 Beats Per Minute.
While it’s most common for a song to remain at the same tempo for its entire duration, there may be scenarios where you want to change your session’s tempo at specific points throughout the song. Some genres, such as progressive rock and classical, feature extensive tempo changes throughout a song for creative effect and to increase rhythmic complexity. Some types of projects are more likely to require tempo changes. For example, if you are scoring to picture, you may need certain music cues to line up perfectly with what’s happening on screen. To do so, you may need to add tempo changes to your music so that your Bars|Beats coincide directly with certain Min:Sec and Timecode values.
If you know your session will require various tempo changes throughout, it’s best practice to map out these tempo changes before recording any musical material. Because Audio tracks are sample-based, audio material on sample-based tracks will be unaffected by tempo events.
Turn On The Conductor Track
When you create a new Pro Tools session, the session is configured by default to follow the tempo events in the Tempo Ruler (also known as the session tempo map). The tempo map can be toggled on and off as needed. To use the tempo map, ensure that the CONDUCTOR TRACK is enabled in the Transport window. The Conductor Track will ensure the click track responds to changes in the Tempo Map.
In the picture below, the Conductor Track button is on the right-side—it looks like a conductor with a baton. When this button is blue, it means the Conductor Track is toggled on.
Inserting And Editing Tempo Events
The simplest way to change your session tempo at a specific point is to use the “Add Tempo Change” option in Pro Tools. To insert an individual tempo event, do one of the following:
Place the playback cursor on the Bar|Beat location where you want to add the tempo event. Click the Add Tempo Change button (the “+” button) at the left of the Tempo Ruler to add a tempo change at that location.
Control-Click (Mac) or Start-Click (Windows) in the Tempo ruler at the location where you want to insert the event. While holding Control/Start, the cursor displays as a Grabber with a “+” sign.
Either of these actions will open the Tempo Change dialog box, where you can enter the Location and BPM value for the tempo change.
The new tempo event will be inserted at the specified location and will appear in the Tempo ruler. Tempo events appear as small triangles followed by a note icon and a BPM indicator.
To change the location of a tempo event, do one of the following:
Click and drag the triangle to a new location in the Tempo ruler.
Double-click on the triangle and specify a new location in the Tempo Change window.
To change the BPM value of a tempo event:
Double-click on the triangle and specify a new BPM value in the Tempo Change window.
Graphic Tempo Editor
The above methods of adding and editing tempo events are effective for creating simple tempo changes at specific Bar|Beat locations. However, Pro Tools provides additional options for displaying and editing tempo events. The Graphic Tempo Editor can be expanded to display a graphical representation of your tempo changes using a menu command or the ruler’s expand/collapse triangle. Displaying the Graphic Tempo Editor will allow you to perform more complex tempo operations.
To display the Graphic Tempo Editor, do one of the following:
Choose View > Rulers > Tempo Editor
Click the expand/collapse triangle at the head of the Tempo ruler.
The Tempo Editor displays in a resizable lane beneath the Tempo ruler and can be used to view and edit tempo information graphically.
Editing Tempo Events In The Tempo Editor
Tempo events in the Graphic Tempo Editor can be edited using any of the following methods:
Individual tempo events can be dragged horizontally and vertically with the Grabber tool to adjust their locations and BPM values.
New tempo events can be drawn individually or as a continuous series using the Pencil tool.
A group of selected tempo events can be scaled up or down with the Trim tool.
Tempo events can be selected and copied, pasted, nudged, and shifted
Using The Grabber Tool
The Grabber tool lets you change tempo settings by dragging individual tempo events in the Tempo Editor.
To edit a tempo event with the Grabber too, do one of the following:
Drag the vertical tempo line to the left or right to adjust the location of the tempo event.
Drag the diamond-shaped tempo event handle up or down to increase or decrease tempo.
To remove a tempo event with the Grabber tool, Option-Click (Mac) or Alt-Click (Windows) on a tempo event handle with the Grabber tool to erase it.
Creating Tempo Curves In The Graphic Tempo Editor
There may be situations where you would like to add a gradual increase in tempo or a gradual decrease in tempo. For example, if you want to connect two tempo events with a gradual change rather than making a sudden tempo change, this will be the operation you want to perform. This can be done using the Pencil Tool.
Using The Pencil Tool
Tempo events can be drawn in the Tempo Editor using the Pencil tool, with the following shapes:
Free Hand
Line
Parabolic
S-Curve
Note: The Triangle, Square, and Random Pencil shapes are not functional in the Tempo Editor.
The shape you draw is reproduced as a series of steps according to the Tempo Edit Density setting.
Setting Edit Density
The Tempo Edit Density button in the Tempo Editor lets you specify the density of tempo events created in the Tempo Ruler when you draw a tempo curve with the Pencil tool.
Setting Resolution
The Tempo Resolution pop-up menu in the Tempo Editor lets you specify the note value that BPM rates are based on when you draw a tempo curve with the Pencil tool. In most cases, the simplest option is to choose Follow Metronome Click. This will use the beat lengths referenced by the current meter, e.g., if the current meter is 4/4, the BPM will reference quarter-note beats; if it is 6/8, the BPM will reference the eighth notes.
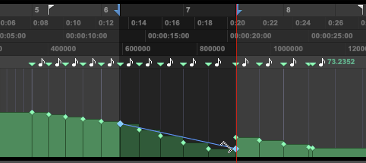
Immediately after you draw a new tempo using the Pencil tool, a tempo curve appears in blue, outlining the newly created tempo graph. Blue adjustment handles also appear on the curve, which you can use to adjust the shape and size of the new tempo graph.
All tempo events under the curve will change as you move the Tempo Curve Adjustment Handles. To suspend changes while you adjust the curve shapes, press Control (Mac) or Start (Windows) while dragging the handles. Tempo events will change to fit the curve when you release the mouse. The adjustment handles are active only until you select a new tool or execute a new command.
Using The Trim Tool
The Trim tool lets you scale all the tempo events in your session or scale selected tempo events only. The Trim tool also lets you stretch a selection of tempo events to cover a longer or shorter area in the timeline.
To scale tempo events with the Trim tool:
Open the Tempo Editor
Using the Selector tool, select the range of tempo events that you wish to affect. (With no selection, any changes you make will affect all events in the session).
Select the Trim tool.
Do one of the following:
To scale the tempo of the selected events, click within the selected area and drag up or down.
To apply a linear speed increase or decrease across existing events, click either the start or end handle for the selected range, and drag up or down.
As you can see there are several ways to set tempo in your Pro Tools session. Each way is utilized in different situations to help you manage your session. In some cases all you need to do is set a "static" tempo, while other sessions will require you to create an advanced tempo map, depending on the complexity of the music your are working on. Pro Tools give you options to accommodate any of these situation no matter how complex your song structure.
Watch the video below to see a demonstration of these techniques in action.
Alex Thomen
Author: Alex Thomen Composer & Music Technology Instructor ProMedia Training, LLC www.protoolstraining.com
888-277-0457
Live Online and Hands-On, In Class Pro Tools Training Available -
Promedia Training offers Pro Tools Training, from beginner to advanced, including Avid Pro Tools Certification and is an official Avid Training Facility. Learn Recording, Editing and Mixing in Pro Tools and take your Music Production to the next level.
Perfect for singers, songwriters, musicians, producers, and audio engineers, including Expert Level Training.
5)Private Training- Arranged in office; please call 888-277-0457.
For Over 20 years, ProMedia has ben an official Avid Training and Certification Center working with beginners to the most advanced users with weekend and short-term Pro Tools Courses.
Alex ThomenComposer / Arranger / Music Technology Instructor
Alex Thomen is a producer, composer, pianist, mixing engineer, and music educator. He attained his Master's Degree in Commercial Music Composition and Arranging from Belmont University in Nashville, TN and taught as an instructor in Music Production at University of Miami Frost School of Music. From small-scale chamber groups and rock bands to full symphonic orchestra, Thomen arranges, produces, and mixes for a variety of ensembles and styles. Thomen’s education and experience have helped refine his skills in contemporary music production for Film/TV/Games. From ambient, musical soundscapes to fantastical, orchestral pieces, television commercials, and more, Thomen’s creative output evokes a vast variety of moods, settings, and themes.