
In this tutorial we show you how to use Pro Tools and Logic simultaneously. We will look at setting up Pro Tools and Logic to use Logic X’s audio effects on Pro Tools audio files and then we will explore triggering Logic X’s MIDI instruments via MIDI tracks in Pro Tools.
Guide to DAW Synchronization Part 2
Synchronizing Pro Tools & Logic X
The following tutorials presume you have a basic understanding of the DAW’s you wish to integrate in your session and are using the Macintosh Platform.
I have always been impressed with Logic’s MIDI capabilities, the advent of MIDI events and Tracks Stacks have only added to it’s appeal. Since Logic X cannot be run as a rewire slave and only operated as a master DAW most people think Pro Tools and Logic X cannot be synchronized, yet it is actually quite simple to set this up in reality.
If you ever wished to use Logic’s Software Instruments, MIDI effects or Audio Effects in your Pro Tools session then the following tutorial is for you, the following techniques utilizes Logic X’s instruments and plug-ins in much the same way as using any other third party plug-in your Pro Tools session, it does not require any synchronization as all the events remain within Pro Tools.
To keep these tutorials simple I have based them on using a system that utilizes the Macintosh’s Built In audio, with a little thought they could be applied to most scenarios.

Using Logic X’s Audio Effects in Pro Tools
Setting Up The Audio Side
In order to get the Audio flowing between the two DAW’s we must first deal with the audio routing, in the previous examples we have used ‘Rewire’ but that system cannot be used here due to the fact that Pro Tools and Logic can only run as Master applications. The system we will use instead is ‘Soundflower’.
‘Soundflower is a Mac OS X kernel extension that enables audio to be passed between applications. It acts as a virtual audio device, with both inputs and outputs. With it, any audio application can send and receive audio’.
The official release of the application (430kb) can exist in either a two channel or sixty four channel version, there are however a few stability issue’s relating to the sixty four channel version running with Pro Tools, and as we will generally need more than two channels I will be using a modified version of the application which allows anywhere from two to twenty channels to be used, it can be found here:
Remove any previous version of Soundflower using the official uninstaller and install this modified new version. You will be required to restart your computer when finished.
Audio MIDI Setup
Once Soundflower is installed, we need to create an alternative ‘aggregate device’ this specifies the amount of channels, clock source and sample rate the session will be using, this is done via the Macintosh’s Audio MIDI Setup application (Go>Utilities>Audio MIDI Setup).
1. Open Audio MIDI Setup
2. Select Window > Show Audio Window
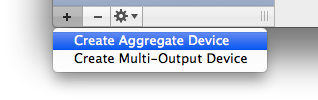
3. At the bottom left corner of Audio MIDI Setup click the ‘+’ symbol and select ‘Create Aggregate Device’.
The new device will appear at the bottom of the list (you may need to scroll down to see it). Double-click on the name of the device and give it a more suitable name to identify it such as ‘Pro Tools/Logic Aggregate Device’.
Now configure the new aggregate device.
1. Set the Clock Source.
2. Set the sample rate (this must be the same in Soundflower, Pro Tools & Logic).
3. Select the amount of input/output channels you require to be active.
If you are unsure copy the settings shown below.

4. When complete close the application.
Settings within Logic Pro X
1. Open Logic X and create a stereo audio track and turn its input monitoring on (click the ‘I’ on the track header).
2. Set the projects sample rate to match the sample rate in the new aggregate device (File Menu > Project Settings > Audio), Logic defaults to 44.1kHz.
3. Open the Audio Preferences (Logic Pro X > Preferences > Audio) and select the new aggregate device as the input and output device.

4. Set the audio track’s input to be ‘Input 3-4’ and it’s output to be ‘Output 5-6’.
Settings within Pro Tools
1. Open Pro Tools and create a blank session.
2. Set the playback device in Pro Tools to be the new aggregate device (Setup > Playback Engine). Pro Tools will save and re-launch to use the new device.

3. Configure the I/O setup in Pro Tools (Setup > I/O Setup). If your new inputs and outputs are not visible click the ‘Default’ button to restore the default settings. You will need to rename both the inputs and outputs to give each a unique name, if you do not Pro Tools will prompt you to do so.
Before renaming

After renaming

Note: You may need to manually create the inputs and outputs if conflicts persist.
3. Check the Pro Tools sample rate matches both Soundflower’s and Logic X’s (Setup > Session).
4. Create a stereo audio track and either record some audio or import an audio file on to it.
Sending Audio from Pro Tools to Logic X
5. Create a send on the Pro Tools audio track and assign the output to the first Soundflower Aggregate Devices’ output (in the example above ‘SF 3-4’). Set the sends’ fader up to unity (0.0).

6. Play Pro Tools, you should now see the audio flowing from the send in pro Tools into the Logic X channel.

7. Create another stereo audio track in Pro Tools and turn its input monitoring on (click the ‘I’ on the track header), assign its inputs to ‘SF 5-6’. This channel will be used to return the audio from Logic X into the Pro Tools Mixer. I have opted for an audio track rather than an auxiliary track as I may wish to record the audio on to this track later.
Note: Depending on the configuration of your aggregate devices you may find that Pro Tools input numbers and Logic X output numbers do not correlate, this is due to the way each system incorporates the ‘Built In’ inputs and outputs into its counting and your individual configuration. Experiment with your system to find out how they match and rename the Pro Tools I/O to make things less confusing if required.

8. Insert an audio effect on the Logic audio track and set its dry/wet balance to 100% wet. You now have Logic’s audio effects available in your Pro Tools session. If required you can record the effects output into the Pro Tools session on the audio track.
You can add multiple channels of Logic effects by repeating the track creation part process in each of the applications making sure to use unique input and output configurations (providing you have chosen enough Soundflower channels in the Audio MIDI setup).
Remember to save both the Pro Tools and Logic X sessions if applicable.
Method 2: Using Logic X’s MIDI Instruments and MIDI effects in Pro Tools
Configuring the System’s MIDI
A lot of the preliminary setup work required for this audio side of method was covered during the previous exercise (Soundflower, Audio MIDI Setup and Pro Tools / Logic X preferences and settings). Please refer to the previous method before attempting this process.
1. Open the Audio MIDI Setup application (Go>Utiltites>Audio MIDI Setup).
2. Select Window > Show MIDI Window
3. Locate the IAC Driver and double click on it.

4. In the window that opens, click the ‘+’ button to add a new MIDI port, you can double click on the new port’s name if you wish to rename it (Pro Tools – Logic IAC Bus).

Logic Pro X
1. Create a ‘Software Instrument’ track in Logic Pro X and insert a software instrument on to it (in this example I am using Retro Synth).

2. Assign the tracks outputs to the next available Soundflower channel (Output 3-4 in this example).
Pro Tools Setup
1. Create a stereo audio track in Pro Tools and turn its input monitoring on (click the ‘I’ on the track header), assign its inputs to correspond with the Logic instruments outputs (in this example SF 3-4).

If you trigger the Logic Instrument you should now see and hear the audio from the Logic Instrument routing into the Pro Tools mixer.

Sending MIDI from Pro Tools to Logic Pro X
1. Create a MIDI track in Pro Tools, set the MIDI tracks’ output to be channel one of the new IAC Driver you created in the Audio MIDI Setup earlier (Pro Tools – Logic IAC Bus in this example).

Test the connection by playing or entering MIDI information into the track in your Pro Tools session. You should now be triggering the Logic X instrument via MIDI sent from Pro Tools and returning the Instruments’ audio onto the Pro Tools audio track.

The beauty of this and the previous method is that all the data remains within Pro Tools and there is no need to synchronize the two DAW’s. Logic is treated in the same way as any other third party plug-in in this scenario.
Note: If using time based MIDI effects such as Logic X’s Arppegiator be sure to match the two DAW’s tempos.
Synchronizing Pro Tools and Logic X Playback
Synchronization of the two DAWs (to provide playback control of Logic X via the Pro Tools transport) can be achieved through the transmission of MIDI Timecode. This method provides basic synchronization (Play, Stop and positional references) features such as looping the two DAWs in tandem are not supported.
1. Open Pro Tools and navigate to the Setup Menu > Peripherals > Synchronization Tab. As Pro Tools will be the Master, generating the MIDI Timecode and sending it to Logic X, the ‘MTC Generator Port’ setting is the important one to be aware of. The options of IAC ports available here correspond to the ports that are created in the Audio MIDI Setup (Finder>Go> Utilities>Audio MIDI Setup).
2. To create a new IAC MIDI port for the transmission of MIDI Timecode open Audio MIDI Setup > Window > Show MIDI Window.
3. Double click on the IAC Driver Icon.
4. Use the ‘+’ button to add an new IAC Bus, double-click on the newly created bus to give it a recognizable name (IAC MTC Bus in this example).

5. Make sure ‘Device is online’ is selected.
6. In Pro Tools > Setup Menu > Peripherals > Synchronization Tab select the new IAC Bus from the ‘MTC Generator Port’ options.
7. Now navigate to Setup Menu > Session. This window shows session information that must match in both Logic X and Pro Tools.

Make a note of the following settings in order to ensure Logic X’s settings match.
Sample Rate
Timecode Rate
Feet+Frames Rate
Session Start
8. The final thing to setup in Pro Tools is to enable the MTC to be generated. If you do not see the ‘Gen MTC’ icon in your transport control-click on a blank area of the control bar and select ‘Synchronization’.

9. Click on the MTC button to enable the transmission of MTC via the selected IAC Bus in Pro Tools.

Logic X Setup
1. Open Logic X.
2. Control > Click on Logic’s Control Bar. Now select ‘Customize Control Bar and Display’.

3. From the Modes and Functions list make sure ‘Synch’ is ticked.

4. The ‘Synch’ icon will now appear in the Logic X control bar, click the Icon to turn Synch on (shown in blue below). Logic’s Playhead should also turn blue.
![]()
5. Control click the Sync icon and select ‘Synchronization Settings’ to configure Logic X’s behavior.

6. The ‘Synchronization Settings’ window opens.

7. Ensure the following settings are the same as in the Pro Tools ‘Session’ window.
Synch Mode: This should be set to MTC
Frame Rate: This should match the Pro Tools setting.
Plays at SMPTE: This should match the ‘Session Start Time’ in Pro Tools.
8. Press play in Pro Tools, your two DAWs should now be running controlled by the Pro Tools transport.
Note: It is advisable to leave the first bar of your arrangements blank in the DAWs to allow the two systems time to lock.
By: Jason O'Bryan
This article, written by hit Songwriter/ Producer, Educator and Music Technology Pioneer, Jason O'Bryan, discusses how to use Pro Tools and Logic together. With over 20 years of studio experience, Jason O'Bryan has worked as an Audio Engineer, Record Producer, and educator in London, Jamaica, New York, Los Angeles, and Sydney. Along the way he found the time to partner with Barry Ashworth and start the infamous UK band 'Dub Pistols' and tour the world as a performer.

Pro Tools Online Training Now Available: LEARN MORE