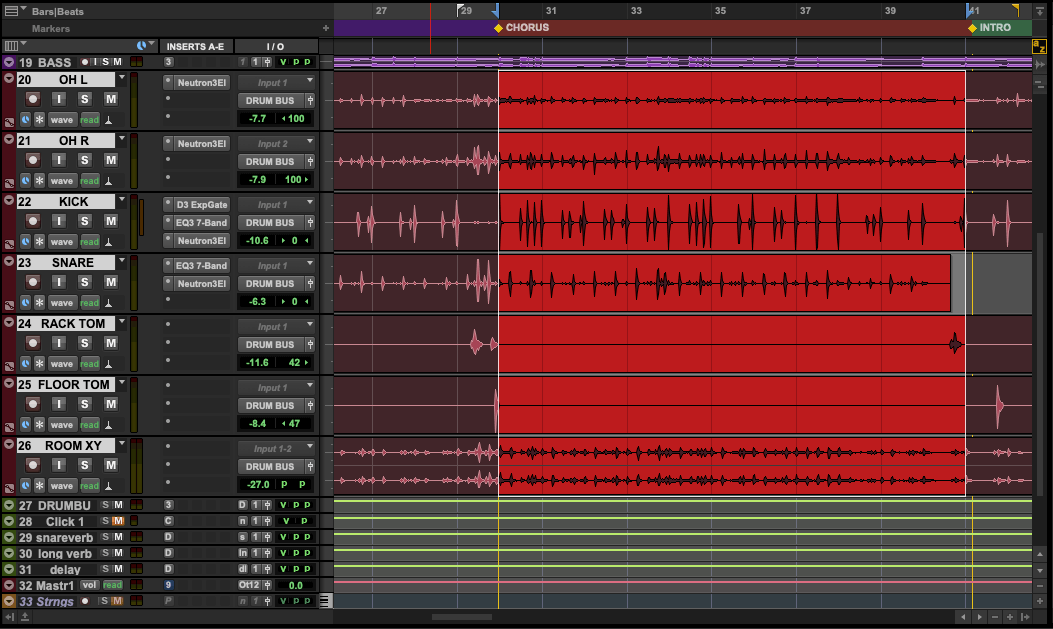
One of the many challenges in Music Production is how to deal with the timing of drum parts. Whether it's for fixing improper timing, creating a tempo map of the drummers performance, or saving the timing of a great drummer as a Groove Quantize file, Pro Tools has a very powerful feature called Beat Detective which allows you to do all of these things.
Beat Detective is a powerful editing in tool in Pro Tools that allows you to control the rhythmic character of a performance. By analyzing and identifying the peak transients or accented notes, Beat Detective can generate beat triggers that allow for different methods of rhythmic manipulation. This article will discuss the different operations Beat Detective can perform on a selection of media, examine the Beat Detective Window and its various controls, and demonstrate how to use Beat Detective to conform a selection of audio.
Because Beat Detective relies on the analysis of peak transients, it is most effective at editing material that has clear attack transients or accent patterns. Therefore, Beat Detective will be most successful with drums, percussion, guitars, or bass. Musical material with legato phrasing, soft attacks, or widely varying tempos will not respond to Beat Detective’s transient analysis properly. Instruments such as vocals, strings, and synth pads will not be ideal for Beat since the attack transients for this instruments can be undefined or unclear.
After Beat Detective has analyzed a musical selection, it can perform the following functions:
- Extract a tempo map from a freely recorded audio or MIDI performance – Beat Detective can extract a tempo map from audio that was recorded without a click or MIDI that was recorded without reference to the session tempo
- Create groove templates – Beat Detective can extract the rhythmic feel from an audio or MIDI performance and save it as a groove template. The groove template can then be applied to other audio or MIDI data using the Groove Quantize functions
- Conform audio to a tempo map—Beat Detective can conform or quantize a performance to align with a specified timing grid by separating the audio into small rhythmic slices. Audio can be conformed to follow the session’s tempo map, improving the timing of individual transients (such as drum hits)
- Smooth edits – Beat Detective’s Edit Smoothing can be used to clean up tracks that contain many clips requiring trimming and crossfading, effectively removing the gaps of silence between the clips.
- The Beat Detective functionality is available through its user interface and operational modes, which can be accessed via the Beat Detective Window. To open the Beat Detective Window, navigate to Event > Beat Detective, or use the keyboard shortcut Command+[8] (Mac) or CTRL+[8] (Windows) on the numeric keypad.
- The Beat Detective Window provides controls for applying Beat Detective workflows in any of its five modes. The top of the window is divided into three sections
- Operation – This is where you can select the Beat Detective mode
- Selection – This is where you will specify the selection range and define the characteristics of your selection
- Detection/Conform/Smoothing – This section changes dynamically depending on the Operation mode selected. Different Operation modes will allow you to adjust different parameters in this section.

Beat Detective Modes
In the Operation section of the Beat Detective Window, there are five different modes. These modes correspond to the workflows Beat Detective supports. The first three modes are the primary operations, which you select based on the intended function. The last two modes are secondary operations, following a Clip Separation pass.
Bar|Beat Marker Generation – This mode generates Bar|Beat Markers corresponding to the transients detected in an audio or MIDI selection. In this mode, Beat Detective creates a tempo map from your selection and applies it to your session.
Groove Template Extraction – This mode analyzes timing, amplitude, and velocity information from selected audio and MIDI data, extrapolates rhythmic and dynamic values, and saves this information either to the Groove Clipboard or to disk as a groove template file.
Clip Separation (Audio Only) – This mode separates the selection into slices based on transients detected in the selection. This mode functions similar to the Separate Clip > At Transients command, but with greater control and precision, creating clips that are metrically significant based on the rhythmic content of the audio.
Clip Conform (Audio Only) – This mode conforms all the separated audio clips within a selection to the current tempo map or a selected groove template. This is typically done following a Clip Separation pass.
Edit Smoothing (Audio Only) – This mode is used to fill the gaps between audio clips or slices by automatically trimming them and optionally inserting crossfades. This process is often used to smooth the edits after Clip Separation and Clip Conform passes.
Using Beat Detective To Conform Audio
Now that we have defined the various modes and functions of Beat Detective, let’s go through the process of aligning audio to the rhythmic grid step-by-step.
Step 1: Define the Selection
Instead of applying Beat Detective processing to an audio track across your entire session, Beat Detective applies processing only to a designated selection. While there isn’t a limit to how long your selection can be, it is best to work with relatively short sections of audio, analyzing and conforming only a few bars at a time—try to limit your selection lengths to 16 bars or 8 bars.
It's important to properly set your selection to ensure Beat Detective analyzes a performance correctly. Make a selection that starts on a downbeat and extends across an exact number of bars and beats in the source material. In addition, make sure no meter or tempo changes are contained in your selection.

You can also define the length of your selection using the Selection section of the Beat Detective Window. This is also where you will need to define your Time Signature for the selected material. Make sure you select the smallest beat subdivision present in your selection using the dropdown box next to “Contains:”. If your selection includes swung notes or triplets, check the “3” box to indicate a triplet modifier.

Step 2: Detect Transients (Identify Beat Triggers)
Once your selection has been properly set, Beat Detective can generate markers, or beat triggers, based on the detected peak transients in the material. Any of the first three operation modes let you identify beat triggers.
The Detection section of the Beat Detective window allows you to adjust the range and type of transients that Beat Detective identifies as beat triggers.
To create beat triggers for a selection:
1. Ensure that your desired Beat Detective mode is active and that your selection has been accurately defined
2. In the Detection section of the window, select a detection algorithm from the Analysis pop-up menu:
- High Emphasis—works well for high frequency, enharmonic material, such as cymbals and hi-hats
- Low Emphasis – works well for low frequency material, such as bass guitar and kick drum, as well as most harmonic/tonal material, such as piano or rhythm guitar
- Enhanced Resolution – Works well for a broad range of material, such as full mixes and loops. This is the default analysis algorithm and is likely to produce the best results for most audio material
3. Click the Analyze button. Beat Detective will analyze the selection using the selected algorithm
4. Set the Resolution to Bars, Beats, or Sub-Beats, based on the rhythmic content of the selection and the level of specificity you wish to detect.
- Select Bars or Beats to generate beat triggers for the start of a bar or a beat location only
- Select Sub-Beats to generate beat triggers for sub-divisions of the beat
5. Adjust the Sensitivity slider until the desired beat triggers appear on the bars, beats, and sub-beats of the selection

Step 3: Review the Beat Triggers
At this point, you will want to zoom into your selection and make sure no additional changes need to be made. If some adjustments need to be made, you can delete, move, and insert beat triggers into your selection
To delete a beat trigger: Use the Grabber tool and Option-Click (Mac) or Alt-Click (Windows) on the trigger to delete it.
To move a beat trigger: Click on the beat trigger with the Grabber tool and drag it to the left or right as needed.
To insert a beat trigger: Using the Grabber tool, click in the selection where you want to insert the beat trigger.
Step 4: Separate Clips
Now that you’ve generated beat triggers and have made sure they are properly located, you can separate your selection into meaningful clips that can be conformed to the grid. To separate clips, do the following:
1. Select the Clip Separation radio button in the Operation selection, if not already selected.
2. Enter a Trigger Pad value between 0 and 50 ms to pad clip start points relative to the beat triggers. This will add space before each beat trigger so you won’t cut out part of the attack of a transient.
3. Click the Separate button. Clips will be separated based on the selected beat triggers.

Step 5: Conform Clips to the Grid
Now that your clips have been separated, you can now adjust the timing of the performance to match the session grid. This is similar to using the Quantize function in the Event Operations window. To conform clips to the grid:
1. In the Beat Detective window, select Clip Conform as your operation mode
2. Verify that the Selection settings you used previously are still active
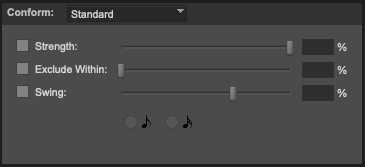
3. Choose Standard from the Conform pop-up menu
4. Select the Strength option and specify a percentage value for how strongly the clips conform to the grid.
5.The Exclude Within slider realigns clips that deviate significantly from the Grid while preserving the original position of those that are already close to the grid. This can help preserve the feel of the recorded performance.
6. The Swing slider determines the amount of swing feel applied to the clip conformation. Under the Swing slider, you can select whether 8th notes are swung or 16th notes.

7. Click the Conform button to automatically conform all the clips in the selection.
8. Audition the new conformed clips to confirm the results. If you’re not satisfied, you can always select Edit > Undo and adjust the parameters differently for a slightly different result.
Step 6: Smooth Edits
After the clips have been conformed to the Grid, you may have gaps between the clips. These gaps may cause the material to sound unnatural on playback. You can use Beat Detective’s Edit Smoothing Operation to automatically fill the gaps between clips and add crossfades. To use Edit Smoothing on clips in a track:
1. Select Edit Smoothing in the Operation section of Beat Detective’s window

2. Make sure the clips to be smoothed are selected in the Edit window
3. In the Smoothing section, do one of the following:
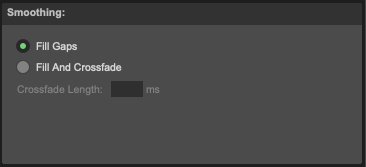
- Select Fill Gaps to trim clip start and end points so that the gaps between clips are filled
- Select Fill and Crossfade to trim clip start and end points and automatically add a pre-fade directly before each clip start point. You will need to specify the Crossfade Length
4. Click the Smooth button to trim the selected clips
After you have finished conforming clips and smoothing, you will be left with numerous clips and crossfades. If you are working with a large session with multiple tracks, the density of these edits can affect system performance. Rendering the results can alleviate your system. To consolidate numerous clips into one long clip, choose Edit > Consolidate or press Option+Shift+3 (Mac) or Alt+Shift+3 (Windows).
As with any editing function that involves working with the timing of several audio tracks, things can get quite messy at first. Give yourself time to practice using Beat Detective, and expect to get unsavory results at first. This is ok, we've all gone through this frustration. The more that you work with it, the easier it will become. I would recommend making a copy of your session using Save As so you can practice on the copy without fear of messing up your main session. Furthermore, try working on smaller section at a time. We've found that we get better results when we break down the drum performance into 4-bar, or 8-bar sections, as opposed to working on the entire drum track beginning to end. You might even have to divide this down into even smaller sections if the drums part does variations such at Triplets, or Dotted Notes. You'll likely want to tackle these separate from the rest of the performance.
Drums are the primary keepers of Rhythm in popular music. They provide the listener, and musicians, with the foundation the rest of the song sits upon, much in the same way a train rides on tracks: without the tracks, the train isn't going anywhere. Beat Detective is a powerful tool that can help you make sure the drum parts are in time with the tempo, or it can be used to generate a tempo map for the song. Either way, Beat Detective allows you to fine tune the rhythm of your songs.
Alex Thomen
Author: Alex Thomen
Composer / Arranger / Pro Audio Instructor
ProMedia Training, LLC
www.protoolstraining.com
888-277-0457


